Welcome to the wonderful world of OneDrive for Business
Designed for business—access, share, and collaborate on all your files from anywhere. The real power behind OneDrive for Business is that it gives employees a place to store files and work on documents that is accessible from anywhere. People can generate documents within their OneDrive space or upload documents and files and have a multitude of tools at their disposal to organize their personal content.
One of the biggest advantages for OneDrive for Business is that it empowers users to easily interact with MS Office files. Business users with OneDrive for Business have the full functionality of PowerPoint, Word, Excel and most other Office 365 applications that interact with it seamlessly in multiple ways.
The files on your OneDrive are private until you share them. It is important to be conscious of who you're sharing your files to so that you can ensure the right people are looking at it, and only those people. Here are step by step instructions to the different sharing methods.
Sharing with specific people
Choose this option if you want to send an email invitation to people or groups and keep track of who you invited. This also lets you remove permission for specific individuals or groups later if you need to.
1. Go to the OneDrive website and sign in with your work account.
2. Pick the files or folders you want to share by selecting its circle icon.
Note: Sharing multiple items at the same time is not available for OneDrive for work or school accounts.
2a. If you're using List view, select the circle on the left side of the item. You can also pick multiple items to share them together.
2b. If you're using Tiles view, select the circle in the top right corner of the item. You can also pick multiple items to share them together.
3. Select Share at the top of the page.
Notes:
If the selected file or folder is shared with someone already, there is a Shared with list at the bottom. Each image is either the profile photo of an individual or the initials of a group that the file has been shared with. If you want to edit the access level for an individual or group, select a photo or group initials to open Manage Access.
If the selected file or folder isn't currently shared with someone, there won't be a Shared with list.
4. Under Send Link, select Anyone with the link can edit to open the link settings.
Note: Depending on settings set by your administrator, you may have different default settings. For example, this button could also say People in <Your Organization> can edit.
5. If you're using OneDrive for work or school, you can change the link permissions.
Select an option for who you want to give access to with the link:
Note: If a sharing option has been greyed out, your organization's admins may have restricted them. For example, they may choose to disable the Anyone option to prevent usable links being forwarded to others outside your organization.
Anyone gives access to anyone who receives this link, whether they receive it directly from you or forwarded from someone else. This may include people outside of your organization.
People in <Your Organization> with the link gives anyone in your organization who has the link access to the file, whether they receive it directly from you or forwarded from someone else.
People with existing access can be used by people who already have access to the document or folder. It does not change any permissions. Use this if you just want to send a link to somebody who already has access.
Specific people gives access only to the people you specify, although other people may already have access. If people forward the sharing invitation, only people who already have access to the item will be able to use the link.
Note: To track access and ensure security, you can only share with someone who is in your organization or has a Microsoft Account.
6. Under Other settings, you can set any of the following options:
Allow editing lets people who are signed in with a Microsoft Account edit the files or folders they have access to. If you're sharing a folder, people with Edit permissions can copy, move, edit, rename, share, and delete anything in the folder they have access to. Unchecking this box means that people can view, copy, or download your items without signing in. They can also forward the link to other people. However, they cannot make changes to the version on your OneDrive.
Notes:
Allow editing is turned on by default.
You can also set editing permissions on the previous screen. Under Send link, next to the Name, group or email field, select the pencil icon to change the editing permissions for the people or groups you have entered.
Block download prevents people from downloading the file or folders they have access to. Unchecking this box means that people can download the files onto their devices.
Note: This option is only available for work or school accounts and if you don't allow editing.
Set expiration date lets you set a date for the link to expire. After the date you set, the link won't work anymore and you will need to create a new link for users requiring access to your file or folder.
Set password lets you set a password to access the file. When a user clicks the link, they will be prompted to enter a password before they can access the file. You'll need to provide this password separately to anyone you want to share the file with.
Open in review mode only limits people to leaving comments and making suggestions on the file.
Notes:
Only Word documents / files have this permission option.
If someone already has editing permissions for the document, selecting Open in review mode only will not prevent them from making edits. For them, the document will open in edit mode.
7. Once you have set all your link settings and permissions, select Apply.
8. In the Name, group or email field, start typing the email addresses or contact names of people you want to share with. When you begin to enter info in the box, you can also choose a contact from the list that appears.
Tip: To quickly share with specific people, you can type in their name or email and then use the pencil icon to the right of the Name, group or email field to select Can edit or Can view. Then follow the same steps below to share with the specific people you listed.
9. Include a message below the Name, group or email field, if you want.
Note: If you want to compose your message in Outlook, select the Outlook button and the link will be inserted into a draft email and everyone you entered to share with will be in the To list.
10. Select Send.
Share by using "Copy link"
Choose this option to share items with lots of people you might not even know personally. For example, you can use these links to post to Facebook, Twitter, or LinkedIn, or share in an email or message. Anyone who gets the link can view or edit the item, depending on the permission you set. Users with the link cannot upload new items. Keep in mind that the link can also be forwarded and sign-in is not required.
Tip: You can generate sharing links through the OneDrive desktop app for Windows 7, Windows 10, and Mac. Just right-click the file or folder in your OneDrive folder on your computer and select Share a OneDrive link. This will copy a link to your clipboard that you can paste where ever you want to send it. However, these links are set by default to Edit permission. If you want to change the permissions, follow the steps below.
1. Go to the OneDrive website and sign in with your Microsoft account or your work or school account.
2. Pick the files or folders you want to share by selecting its circle icon.
Note: Sharing multiple items at the same time is not available for OneDrive for work or school accounts.
2a. If you're using List view, select the circle on the left side of the item. You can also pick multiple items to share them together.
2b. If you're using Tiles view, select the circle in the top right corner of the item. You can also pick multiple items to share them together.
3. Select Share at the top of the page.
Notes:
If the selected file or folder is shared with someone already, there is a Shared with list at the bottom. Each image is either the profile photo of an individual or the initials of a group that the file has been shared with. If you want to edit the access level for an individual or group, select a photo or group initials to open Manage Access.
If the selected file or folder isn't currently shared with someone, there won't be a Shared with list.
Screenshot of the Link Settings page on the Share pop-up in OneDrive
4. Under Copy Link, select Anyone with the link can edit to open the link settings.
Note: Depending on settings set by your administrator, you may have different default settings. For example, this button could also say People in <Your Organization> can edit.
Screenshot of the Share pop-up in OneDrive.
To change the link permissions, select an option for who you want to give access to with the link:
Note: If a sharing option has been greyed out, your organization's admins may have restricted them. For example, they may choose to disable the Anyone option to prevent usable links being forwarded to others outside your organization.
Anyone gives access to anyone who receives this link, whether they receive it directly from you or forwarded from someone else. This may include people outside of your organization.
People in <Your Organization> with the link gives anyone in your organization who has the link access to the file, whether they receive it directly from you or forwarded from someone else.
People with existing access can be used by people who already have access to the document or folder. It does not change any permissions. Use this if you just want to send a link to somebody who already has access.
Specific people gives access only to the people you specify, although other people may already have access. If people forward the sharing invitation, only people who already have access to the item will be able to use the link.
Note: To track access and ensure security, you can only share with someone who is in your organization or has a Microsoft Account.
6. Under Other settings, you can set any of the following options:
Allow editing lets people who are signed in with a Microsoft Account edit the files or folders they have access to. If you're sharing a folder, people with Edit permissions can copy, move, edit, rename, share, and delete anything in the folder they have access to. Unchecking this box means that people can view, copy, or download your items without signing in. They can also forward the link to other people. However, they cannot make changes to the version on your OneDrive.
Notes:
Allow editing is turned on by default.
You can also set editing permissions on the previous screen by selecting the pencil icon to the right of the names you're sharing the file with.
Block download prevents people from downloading the file or folders they have access to. Unchecking this box means that people can download the files onto their devices.
Set expiration date lets you set a date for the link to expire. After the date you set, the link won't work anymore and you will need to create a new link for users requiring access to your file or folder.
Set password lets you set a password to access the file. When a user clicks the link, they will be prompted to enter a password before they can access the file. You'll need to provide this password separately to anyone you want to share the file with.
Open in review mode only limits people to leaving comments and making suggestions on the file.
Notes:
Only Word documents / files have this permission option.
If someone already has editing permissions for the document, selecting Open in review mode only will not prevent them from making edits. For them, the document will open in edit mode.
7. Once you have set all your link settings and permissions, select Apply.
8. Under Copy link, select Copy.
9. Paste the link and send the link where you want to send it, like an email, message, or post.
Versioning, “Backup” and the Recycle Bin
Microsoft was one of the first organizations to enable document “versioning” capability, where users can essentially go back in time through the changes to Office documents that are stored in SharePoint, Office 365 or OneDrive for Business. Users can revert back to the last 500 versions of a document by default, essentially allowing them to go back in time for any individual document for up to and sometimes over 90 days.
Microsoft has enabled a 30-day “Backup” of the information in users’ One Drives for Business, which utilized the versioning functionality to revert all the files in the drive back to a certain point in time.
Versioning does not allow the user to restore documents that have been deleted, but the recycle bin feature allows documents that the user has “deleted” to be restored to the point in time that they deleted it for up to 90 days.
Stop sharing OneDrive or SharePoint files or folders, or change permissions
Need to lock a document or make a document read only? if you're the file owner you can lock the document or make it read only. You can also see who has access, change access permissions, or simply stop sharing it.
Note: You can't change the permission of a sharing link from edit to view or from view to edit. The way around it is to delete your sharing link and create a new one with a different permission.
What you see differs depending whether you're signed in with a personal account or a work or school account. Select a tab below to learn more.
Stop or change sharing
Files and folders can be shared by sending someone a sharing link, or by giving them direct access to the file or folder. (People may also have access to a file or folder if they've been given access to the site itself.)
If you are the file owner, you can stop sharing the file or folder.
If someone has been given direct access, or has access through a specific people link, you can also change the sharing permissions between view and edit.
Here are the steps:
Select the file or folder you want to stop sharing.
Select Information  in the upper-right corner to open the Details pane.
Note: (The Information icon is just below your profile picture. If you don't see it, make sure you only have one file or folder selected - it won't display if you have multiple items selected.)
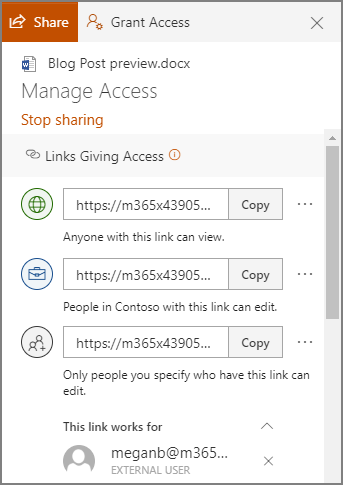
On the Details pane, under the Has Access header, you'll see the People icon, the Links icon, and/or the Email icon. These options vary depending on how you have shared the file or folder. Select Manage access and:
To stop sharing the file entirely, click Stop sharing.
To delete a sharing link, click the ... next to the link, then click the X next to the link to remove it. (You'll get a prompt asking you if you're sure you want to delete the link - if so, click Delete link.)
To stop sharing with specific people, expand the list under a specific people link and click the X to remove someone.
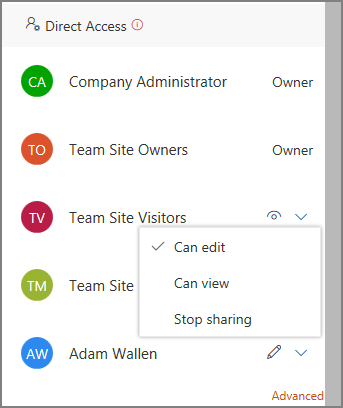
To change permissions or stop sharing with someone who has direct access, under Direct Access, click the dropdown next to the person's name and choose the option that you want.
Tip: You can also manage a file or folder's sharing permissions through the OneDrive desktop app for Windows 7, Windows 10, and Mac. All you need to do is right-click the shared file or folder in your OneDrive folder on your computer, and select Share, then select More  > Manage access, and a dialog box will open on your desktop so you can make your selections as described above in step 3.
See the items you've shared
On OneDrive.com, select Shared in the left pane, and then select Shared by me.