Setting Up MFA in Microsoft
Set up the Microsoft Authenticator app to send notifications
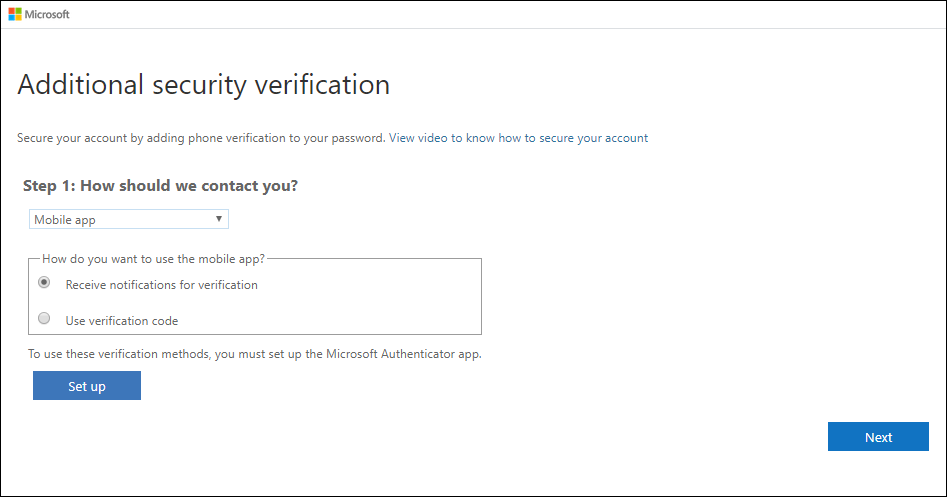
On the Additional security verification page, select Mobile app from the Step 1: How should we contact you area.
Select Receive notifications for verification from the How do you want to use the mobile app area, and then select Set up.

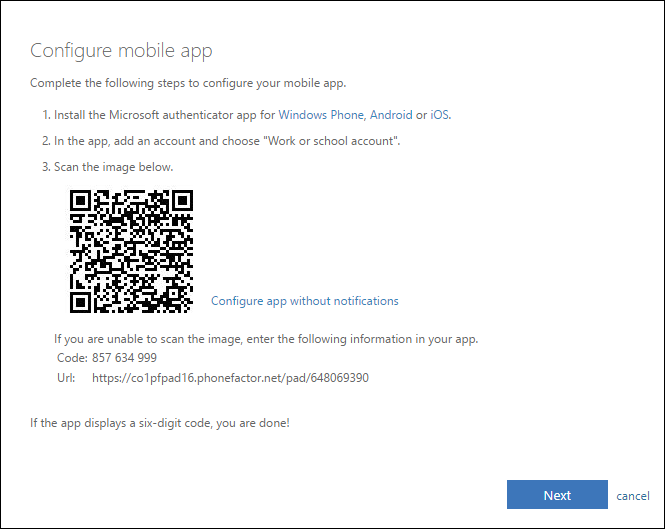
The Configure mobile app page appears.
Open the Microsoft Authenticator app, select Add account from the Customize and control icon in the upper-right, and then select Work or school account.
Note: If you receive a prompt asking whether to allow the app to access your camera (iOS) or to allow the app to take pictures and record video (Android). select Allow so the authenticator app can access your camera to take a picture of the QR code in the next step.
Use your device's camera to scan the QR code from the Configure mobile app screen on your computer, and then choose Next.
Return to your computer and the Additional security verification page, make sure you get the message that says your configuration was successful, and then select Next. The authenticator app will send a notification to your mobile device as a test.

On your mobile device, select Approve.
On your computer, add your mobile device phone number to the Step 3: In case you lose access to the mobile app area, and then select Next. Microsoft recommends adding your mobile device phone number to act as a backup if you're unable to access or use the mobile app for any reason.
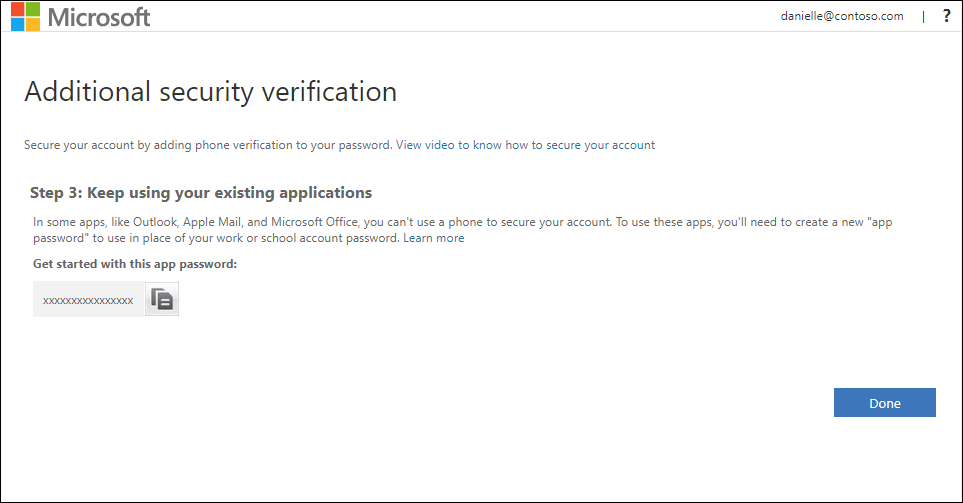
From the Step 4: Keep using your existing applications area, copy the provided app password and paste it somewhere safe.

Note: For information about how to use the app password with your older apps, see Manage app passwords. You only need to use app passwords if you're continuing to use older apps that don't support two-factor verification.
Select Done.
Related Articles
Microsoft Basic Auth deprecates on October 1, 2022
This fact sheet provides guidance on how to determine whether and to what extent your organization is using Basic Authentication (“Basic Auth”) in Exchange Online and how to switch to Modern Authentication ("Modern Auth") before Microsoft begins ...What is Multi-Factor Authentication?
What is Multi-factor authentication? When you sign into your online accounts - a process we call "authentication" - you're proving to the service that you are who you say you are. Traditionally that's been done with a username and a password. ...LastPass Password Migration
Importing your passwords from LastPass to Microsoft Authenticator is easy and quick. There are 7 simple steps, listed below. (Important Note: LastPass only allows exporting passwords from a web browser, not an app or program.) 1. Sign in ...Microsoft: Configure email forwarding in Microsoft 365
As the admin of an organization, you might have company requirements to set up email forwarding for a user's mailbox. Email forwarding lets you forward email messages sent to a user's mailbox to another user's mailbox inside or outside of your ...Microsoft Bookings Setup Guide
Setting up Microsoft Bookings in 13 Simple Steps Watch a video overview on the topic here: https://vimeo.com/778523419/08162b4c73 How to Setup: (manual setup instructions) 1. Open MS Edge browser, then go to https://Outlook.office.com/bookings ...